

How to Build a Decentralized To-do App with Solidity and Alchemy
Create and deploy a to-do application on the Goerli test network using Solidity, Alchemy, Hardhat, MetaMask, and React.


Table of contents
- Prerequisites
- 1. Setup dev environment with Hardhat
- 2. Set up an Alchemy account
- 3. Set up a MetaMask wallet
- 4. Get Goerli test ethers
- 5. Configure Hardhat
- 6. Create a Solidity smart contract
- 7. Write tests for the smart contract
- 8. Run the tests
- 9. Write a deploy script
- 10. Deploy smart contract to the Goerli test network
- 11. Create the frontend with React
- 12. Connect MetaMask wallet to the app
- 13. Create the UI for the to-do app
- 14. Create the functions for adding, deleting, and getting the tasks
- 15. Create the task component
- 16. Test the app
Decentralized applications, or dApps, are the applications that run on the Ethereum network. In this post, you’ll learn how to create and deploy a to-do application on the Goerli test network using Solidity, Alchemy, Hardhat, MetaMask, and React.
Before setting up the project, let’s take a look at the technologies you’ll be using:
- Solidity is a programming language used to create smart contracts
- Hardhat is used for building, testing, and deploying local blockchain networks
- Ethers.js interacts with the blockchain and smart contracts
- MetaMask is a virtual wallet and an extension to Chrome
- React.js is a JavaScript library for building user interfaces on the web
- Alchemy is an Ethereum node provider
Prerequisites
- Node.js
- A package manager for installing packages. You can use npm or Yarn. When you install Node.js,
npmis installed by default.
If you want to see the complete project developed throughout this post, take a look at the GitHub project. Feel free to clone it, fork it, or submit an issue. You can see the finished application’s image below.

1. Setup dev environment with Hardhat
Hardhat is an environment developers use to test, compile, deploy and debug decentralized applications. It allows to develop a local blockchain network and mimics the Ethereum mainnet.
- Navigate to the directory where you want to place the todo project. Create a directory named
todo-dapp. Change your directory into thetodo-dappdirectory.
mkdir todo-dapp && cd todo-dapp
- Now, open your preferred code editor and initialize an npm project with the following command from your terminal:
npm init -y
This will create a package.json file.
- Then, install the
hardhatpackage:
npm install --save-dev hardhat
- Once installed, create your Hardhat project:
npx hardhat
When it’s prompted, press enter for all the questions.

- Now, install
@openzeppelin/contractsanddotenvpackages.
npm install @openzeppelin/contracts dotenv
OpenZeppelin contracts provide secure smart contract development by implementing the ERC20 and ERC721 standards.
Dotenv is a package used to save sensitive data in a .env file.
2. Set up an Alchemy account
Alchemy empowers developers to build scalable and reliable decentralization apps.
- Create a free account on Alchemy.
- Once you’ve created an Alchemy account, create an app to generate an API key. Click
+ Create App, this will open up a popup box.

Name your app “todo” and choose Goerli for the network.

After you’ve created your app, click “View Details” and “ View Key”. Copy the HTTPS key. You’ll use this key later.

3. Set up a MetaMask wallet
To send and receive transactions, you need an Ethereum wallet. MetaMask is an extension to the Chrome, it allows us to interact with Ethereum applications.
- Download the extension and create a MetaMask account.
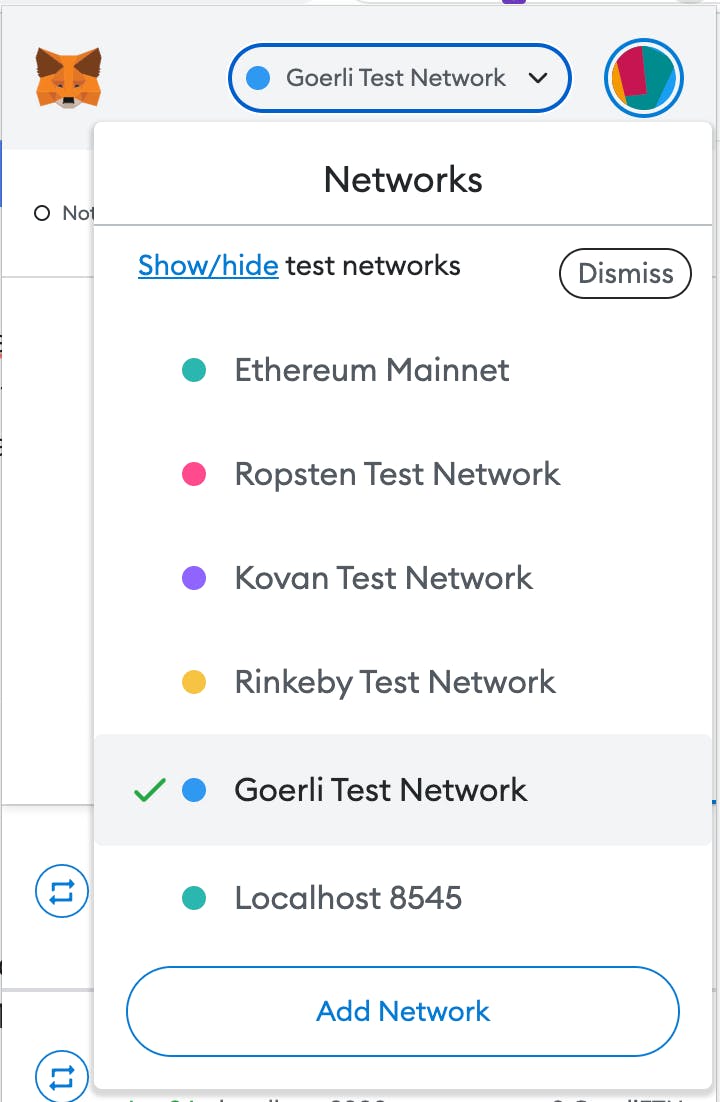
- Change your network to the Goerli Test Network.
- Get your private key from MetaMask. Click Account details → Export your private key → type your MetaMask password.
Note: Never share your private keys with anyone.

4. Get Goerli test ethers
You’ll need some Goerli ethers to deploy the smart contract. Copy your wallet address from MetaMask.

Navigate to Goerli Faucet and paste your wallet address. Click “Send Me ETH”, and you’ll get 0.05 Goerli ETH.
5. Configure Hardhat
Go to your project and create a .env file at the root of your project.
Create environment variables and paste your private key from MetaMask and Alchemy HTTPS URL to this file.
    ALCHEMY_URL="paste your Alchemy HTTPS URL"
    WALLET_PRIVATE_KEY="paste your MetaMask private key"
You’ll access these variables from hardhat configuration.
Navigate to hardhat.config.js file. Require dotenv package and export networks.
    require("@nomiclabs/hardhat-waffle");
    require("dotenv").config();

    module.exports = {
      solidity: "0.8.4",
      networks: {
        goerli: {
          url: process.env.ALCHEMY_URL,
          accounts: [process.env.WALLET_PRIVATE_KEY],
        },
      },
    };
Here, you’re accessing ALCHEMY_URL and WALLET_PRIVATE_KEY via process.env.
Now, you’ve configured Alchemy and MetaMask with the hardhat project. Later, you’ll deploy our smart contract to the Goerli test network.
6. Create a Solidity smart contract
Solidity is a programming language used to implement smart contracts. A smart contract is a piece of code that lives on the blockchain. You can use smart contracts to send money, receive money, and transfer assets. Smart contracts are at the core of Ethereum.
If you’re using Visual Studio Code, make sure to install Solidity extension from Visual Studio Marketplace because you’re ready to write our smart contract.
- Create a new file named
TaskContract.solundercontractsdirectory. Solidity files have an extension of.sol.
    //SPDX-License-Identifier: Unlicense
    pragma solidity ^0.8.0;
Thepragma keyword specifies the version of Solidity. When you deploy the smart contract, the compiler will look for the specific version; so that our code doesn’t break.
contract TaskContract {}
The contract keyword specifies the name of the contract.
    //SPDX-License-Identifier: Unlicense
    pragma solidity ^0.8.0;

    contract TaskContract {
        struct Task {
            uint256 id;
            string taskName;
            bool isDeleted;
        }

      // an array that will hold all the task structs
        Task[] private tasks;

        mapping(uint256 => address) public taskToOwner;
    }
struct is a custom data structure that allows the user to create their own data type in the form of a structure. There are different data types like integer, string, or boolean. You can learn more about the data types in the Solidity documentation.
Then, you have a task array that will hold all the task struct, which will be a private array.
Then, you're simply mapping that task id to the address of the task owner; so that you can search for our tasks easily.
Contracts can emit events when certain conditions are met. Events are used to log information on the blockchain.
- Create
AddTaskandDeleteTaskevents.
    contract TaskContract {
        event AddTask(address recipient, uint256 taskId);
        event DeleteTask(uint256 taskId, bool isDeleted);
    }
- Create the functions. The first function will be a function to add a new task.
    contract TaskContract {

        function addTask(string memory taskText, bool isDeleted) external {
            uint256 taskId = tasks.length;
            tasks.push(Task(taskId, taskText, isDeleted));
            taskToOwner[taskId] = msg.sender;
            emit AddTask(msg.sender, taskId);
        }
    }
Add task function accepts taskText and isDeleted parameters and the visibility is set to external, so you can call it from the frontend.
Let’s look at what’s happening in the code:
- The task id will change based on the length of the task array.
- Then, push the new task to the tasks array.
- Map the task to its owner and store the address of the person who is calling the function.
- Emit the
AddTaskevent with the recipientmsg.senderand task id.
- Write the functionality for the delete task function.
    contract TaskContract {

      function deleteTask(uint256 taskId, bool isDeleted) external {
            if (taskToOwner[taskId] == msg.sender) {
                tasks[taskId].isDeleted = isDeleted;
                emit DeleteTask(taskId, isDeleted);
          }
    }
This function will use the task id to find the task and will set isDeleted to true.
With the if statement, you’re checking if the sender owns the task or not. If it’s true, it will set the tasks isDeleted value to isDeleted. Then, emits the DeleteTask event.
- Finally, create a function to get all the tasks.
    contract TaskContract {

      function getMyTasks() external view returns (Task[] memory) {
            Task[] memory temporary = new Task[](tasks.length);
            uint256 counter = 0;

            for (uint256 i = 0; i < tasks.length; i++) {
                if (taskToOwner[i] == msg.sender && tasks[i].isDeleted == false) {
                    temporary[counter] = tasks[i];
                    counter++;
                }
            }

            Task[] memory result = new Task[](counter);
            for (uint256 i = 0; i < counter; i++) {
                result[i] = temporary[i];
            }

            return result;
        }
    }
This function will not update the state; so, it’s a view function. You’ll not emit any events or require any gas fees. It will return an array of tasks.
Inside the function, you have created a temporary task array that is just storing the memory.
Then, you’re looping through the task array, checking which tasks belong to the sender, and storing those tasks in the temporary array.
If the task is not deleted and the message sender is matching with the taskToOwner, store the task structure in the temporary array. Also, increase the counter by 1.
You're creating another variable called result, and returning the result.
7. Write tests for the smart contract
Smart contracts are immutable. So, before deploying our contract, you need to write unit tests to make sure all our functions and variables in our smart contracts are working and returning the correct values.
Use mocha and chai for testing.
- Create a new file called
TaskContractTest.jsunder thetestdirectory.
Mocha is a testing framework for JavaScript. It can be used for frontend applications and backend applications like Ethereum Decentralized Apps. Mocha uses hooks to organize its structure.
describekeyword is used to group the tests.beforeEach()hook is run before each test.it()hook describes the task cases.
Chai is an assertion library for Node. It uses expect(), assert(), and should() functions.
Use the expect() function in your tests. This function takes the expected value as an argument and returns an object with methods for testing, which are referred to as matcher functions.
- Both are available as NPM packages. Install the packages from your terminal:
npm install --save-dev mocha chai
- Import
expectfromchaiandethersfrom thehardhatlibrary.
    const { expect } = require("chai");
    const { ethers } = require("hardhat");

    describe("Task Contract", function () {
      let TaskContract;
      // instance of the contract
      let taskContract;
      let owner;
      const NUM_TOTAL_TASKS = 3;
      let totalTasks;

      beforeEach(async function () {
        TaskContract = await ethers.getContractFactory("TaskContract");
        [owner] = await ethers.getSigners();
        taskContract = await TaskContract.deploy();

        totalTasks = [];

        // generate dummy tasks
        for (let i = 0; i < NUM_TOTAL_TASKS; i++) {
          let task = {
            taskText: "Task Number -" + i,
            isDeleted: false,
          };
          await taskContract.addTask(task.taskText, task.isDeleted);
          totalTasks.push(task);
        }
      });
}
Before creating any test case, generate dummy tasks and create a task object. Then, call addTask function from our smart contract to add the dummy tasks.
- Now, write tests for adding a task.
    describe("Add Task", function () {
    it("Should emit AddTask event", async function () {
      let task = {
        taskText: "New Task",
        isDeleted: false,
      };

      await expect(await taskContract.addTask(task.taskText, task.isDeleted))
        .to.emit(taskContract, "AddTask")
        .withArgs(owner.address, NUM_TOTAL_TASKS);
    });
  });
Here, emit the addTask function with the owner address, and the number of task arguments.
- Now, add the tests for getting all the tasks and deleting a task.
  describe("Get All Tasks", function () {
    it("Should return the correct number of total tasks", async function () {
      const tasksFromChain = await taskContract.getMyTasks();
      expect(tasksFromChain.length).to.equal(NUM_TOTAL_TASKS);
    });
  });

  describe("Delete Task", function () {
    it("Should emit delete task event", async function () {
      const TASK_ID = 0;
      const TASK_DELETED = true;

      await expect(taskContract.deleteTask(TASK_ID, TASK_DELETED))
        .to.emit(taskContract, "DeleteTask")
        .withArgs(TASK_ID, TASK_DELETED);
    });
  });
For getting all the tasks, you're expecting the number of the tasks on the blockchain to be equal to the number of total dummy tasks.
Delete task function will call thedeleteTask function from our smart contract and will emit the DeleteTask event with arguments task id and task deleted.
Note that you can only update the isDeleted value, as you cannot delete data from a blockchain.
8. Run the tests
Run the following command to run the tests:
npx hardhat test
This command should output that all tests are passing.

9. Write a deploy script
Before deploying your contract, write a deployment script.
Go to the scripts directory and create a new file called deploy.js.
    const { ethers } = require("hardhat");

    const main = async () => {
      const contractFactory = await ethers.getContractFactory("TaskContract");

      const contract = await contractFactory.deploy();
      await contract.deployed();

      console.log("Contract Deployed to: ", contract.address);
    };

    const runMain = async () => {
      try {
        await main();
        process.exit(0); // success
      } catch (error) {
        console.log(error);
        process.exit(1);  // failure
      }
    };

    runMain();
The code for this deploy script comes from Hardhat. If you're curious to learn about each line of code, check out the Hardhat documentation.
Notice that you're console logging the contract address.
10. Deploy smart contract to the Goerli test network
To deploy the smart contract, go to the terminal and run:
npx hardhat run scripts/deploy.js --network goerli
This will output something similar to this:
Contract Deployed to: 0x1704C65ABE3f6ea8251325ec8A6A5f3c4D01A1D7
Copy and paste the contract address somewhere, because you’ll use it in our frontend code. You can also check the deployment on the Goerli Etherscan. Search the contract address and see the details of your deployment. You can check this link if you haven’t followed along.

11. Create the frontend with React
You’ll create the front end of our application with React. React.js is the leading JavaScript library for building user interfaces (UIs). It was created and is maintained by Meta, formerly Facebook.
- Go to the
todo-dappproject terminal and run the following command:
npx create-react-app frontend
In order to interact with our deployed smart contract, you will need two things. The first is the contract address and the second is the application binary interface (ABI).
To get the ABI, simply copy the TaskContract.json file, which is located at the artifacts/contracts/TaskContract.sol/TaskContract.json.
Now, navigate to the frontend folder. Inside the src folder create a new folder named abi and paste the JSON file which contains the contract ABI.
You have the contact address when you deploy your smart contract. Create a config.js file under
frontend/src/ and export your TaskContractAddress.
export const TaskContractAddress = "0x1704C65ABE3f6ea8251325ec8A6A5f3c4D01A1D7";
Your frontend project directory now should look like this:
frontend
├── src
│   ├── abi
│   |   └── TaskContract.json
|   └── App.js
|   └── config.js
└── package.json
- Change your directory into the frontend folder:
cd frontend
- Install the following packages:
npm install ethers @emotion/react @emotion/styled @mui/icons-material @mui/material
Let’s review the installed packages:
- Ethers is a package required to interact with the smart contract frontend.
- Emotion is a library for writing CSS styles with JavaScript.
- MUI or Material UI is a library of React UI components that implements Google's Material Design.
- Open the
App.jsfile, write the logic of your app here.
    import { useState } from "react";
    import "./App.css";

    const App = () => {
      const [tasks, setTasks] = useState([]);
      const [input, setInput] = useState("");
      const [currentAccount, setCurrentAccount] = useState("");
      const [correctNetwork, setCorrectNetwork] = useState(false);

      return (

      )
    };

    export default App;
Here, you’ve imported the useState hook from React, and defined some state variables.
You'll keep your tasks in an array and get the users’ input as a string. You're also keeping track of the state of the current MetaMask account. It will check whether MetaMask is connected or not.
Also, you have a state for the correct network. Here, it’s the Goerli network. With this state variable, you’ll check if the Goerli test network is selected. Otherwise, it will alert the user to change their network.
12. Connect MetaMask wallet to the app
In order for our app to talk to the blockchain, you need to connect your wallet to it. In the App.js file, write the following code after the state variables:
    const connectWallet = async () => {
        try {
          const { ethereum } = window;

          // User didn't install metamask in their browser
          if (!ethereum) {
            console.log("No Metamask detected");
          }

          // check which network is connected
          let chainId = await ethereum.request({ method: "eth_chainId" });
          console.log("Connected to chain:", chainId);

          const goerliChainId = "0x5";
          if (chainId !== goerliChainId) {
            console.log('Please connect to the "Goerli" network');
            return;
          } else {
            setCorrectNetwork(true);
          }

          // get the current account
          const accounts = await ethereum.request({
            method: "eth_accounts",
          });
          console.log("Connected to account:", accounts[0]);
          // set current account to MetaMask account
          setCurrentAccount(accounts[0]);
        } catch (error) {
          console.log("Error connecting to wallet", error);
        }
      };
The connectWallet function will check if the ethereum object exists or not. If you're logged in to MetaMask, it will inject an object named ethereum into our window.
- If not, it means the user didn't install the MetaMask in their browser.
- If the MetaMask is installed, it will check which network MetaMask is being connected to. It can be Rinkeby, Goerli, or any other network.
The Goerli network has the chain ID of 0x5, so you'll compare the chain IDs.
After comparing the IDs, you need to set the current account to the user's MetaMask account. For that, you need to use ethereum.request(args) with the eth_accounts method. The user can have multiple accounts in their wallet that's why you're only getting the first one.
13. Create the UI for the to-do app
Once you've connected to the MetaMask account, you can work on creating the UI. You'll display the UI based on some conditions.
- If the current account is empty, the UI will show a button to connect to the wallet.
- If the user is connected to the right network and also the current account is okay, you will have an Add button and a text input field.
- Else, you'll show a message to the user to connect to the Goerli network and reload the page.
// App.js

    return (
        <>
          {currentAccount === "" ? (
            <center>
              <button className="button" onClick={connectWallet}>
                Connect Wallet
              </button>
            </center>
          ) : correctNetwork ? (
            <div className="App">
              <h2>To-do DApp</h2>
              <form>
                <TextField
                  id="outlined-basic"
                  label="Make Todo"
                  variant="outlined"
                  style={{ margin: "0 5px" }}
                  size="small"
                  value={input}
                  onChange={(e) => setInput(e.target.value)}
                ></TextField>
                <Button variant="contained" color="primary" onClick={null}>
                  Add Task
                </Button>
              </form>
            </div>
          ) : (
            <div className="flex flex-col justify-center items-center mb-20 font-bold text-2xl gap-y-3">
              <p>Please connect to the Goerli Testnet and reload the page.</p>
            </div>
          )}
        </>
      );
You've created the basic UI, and check how the app is looking. From the frontend directory, run npm start. The application will open the localhost:3000 port.
14. Create the functions for adding, deleting, and getting the tasks
Import the ethers library, abi, and the task contract address.
The functionality of adding, deleting, and getting the tasks will be similar.
For the adding task function, you need to get the Web3Provider from the ethers library with the MetaMask information and get the signer.
Then, you created a contract object and called the addTask function. Also, added the new task to the tasks array.
// App.js

import { TaskContractAddress } from "./config";
import { ethers } from "ethers";
const { abi } = require("./abi/TaskContract.json");

const App = () => {

   const addTask = async (e) => {
    e.preventDefault();
    let task = {
      taskText: input,
      isDeleted: false,
    };

    try {
      const { ethereum } = window;
      if (ethereum) {
        const provider = new ethers.providers.Web3Provider(ethereum);
        const signer = provider.getSigner();

        const TaskContract = new ethers.Contract(
          TaskContractAddress,
          abi,
          signer
        );

        // smart contract function call
        TaskContract.addTask(task.taskText, task.isDeleted)
          .then((result) => {
            // append new task to the list of tasks
            setTasks([...tasks, result]);
          })
          .catch((error) => {
            console.error("Error occurred while adding a new task", error);
          });
      } else {
        console.log("Ethereum is not available");
      }
    } catch (e) {
      console.log("error submitting the task", e);
    }
    // clear the input fields
    setInput("");
  };

}
For deleting a task, you'll send the item id along with the function. Similar to adding a to-do, you'll get the Web3Provider from the ethers library with the MetaMask information and get the signer.
Then, you called the deleteTask function with the key and isDeleted passed as true. In the end, update the tasks with the currently not deleted tasks.
// App.js

 const deleteTask = (key) => async () => {
    try {
      const { ethereum } = window;
      if (ethereum) {
        const provider = new ethers.providers.Web3Provider(ethereum);
        const signer = provider.getSigner();

        const TaskContract = new ethers.Contract(
          TaskContractAddress,
          abi,
          signer
        );

        // is deleted is true
        await TaskContract.deleteTask(key, true);
        let allTasks = await TaskContract.getMyTasks();
        setTasks(allTasks);
      } else {
        console.log("Ethereum is not available");
      }
    } catch (error) {
      console.log(error);
    }
  };
For getting all the tasks, you'll have a similar logic. Get the tasks and update the state of the tasks.
 const getAllTasks = async () => {
    try {
      const { ethereum } = window;
      if (ethereum) {
        const provider = new ethers.providers.Web3Provider(ethereum);
        const signer = provider.getSigner();

        const TaskContract = new ethers.Contract(
          TaskContractAddress,
          abi,
          signer
        );

        let allTasks = await TaskContract.getMyTasks();
        setTasks(allTasks);
      } else {
        console.log("Ethereum is not available");
      }
    } catch (error) {
      console.log(error);
    }
  };
15. Create the task component
Create a Task component, this will create the UI of each task. Create a new folder inside frontend directory named components. Here, create a new file called Task.js.
// components/Task.js

import { List, ListItem, ListItemText } from "@mui/material";
import DeleteIcon from "@mui/icons-material/Delete";

const Task = ({ taskText, onClick }) => {
  return (
    <List className="todo__list">
      <ListItem>
        <ListItemText primary={taskText} />
      </ListItem>
      <DeleteIcon fontSize="large" style={{ opacity: 0.5 }} onClick={onClick} />
    </List>
  );
};

export default Task;
Pass the taskText and onClick as props and reference these props from App.js. Go to App.js file, and create a useEffect hook. TheuseEffect hook will help us call the connectWallet and getAllTasks functions as soon as the app is rendered.
// App.js

import {  useEffect } from "react";

const App = () => {

    useEffect(() => {
      getAllTasks();
      connectWallet();
    }, []);

 return (
    <>
      // ....
      ) : correctNetwork ? (
        <div className="App">
          <h2>To-do dApp</h2>
          <form>
            <TextField
              id="outlined-basic"
              label="My Todos"
              variant="outlined"
              style={{ margin: "0 5px" }}
              size="small"
              value={input}
              onChange={(e) => setInput(e.target.value)}
            ></TextField>

            {/*  assign addTask function to onClick button event */}
            <Button variant="contained" color="primary" onClick={addTask}>
              Add Task
            </Button>
          </form>

        {/* map through the tasks array and display the Task component */}
          <ul>
            {tasks.map((item) => (
              <Task
                key={item.id}
                taskText={item.taskText}
                onClick={deleteTask(item.id)}
              ></Task>
            ))}
          </ul>
        </div>
      ) : (
        // ....
      )}
    </>
  );
}
For displaying the tasks, first, map through the tasks array and display each task with the Task component. Pass the taskText, and onClick props to it.
16. Test the app
That's it! Our app is complete. Run the app from the frontend folder with npm start. Go ahead and test the application at localhost:300.
Make sure that you've installed MetaMask in your browser and connected to the Goerli network. Also, connect to the localhost:3000. You can do this by following the GIF below.

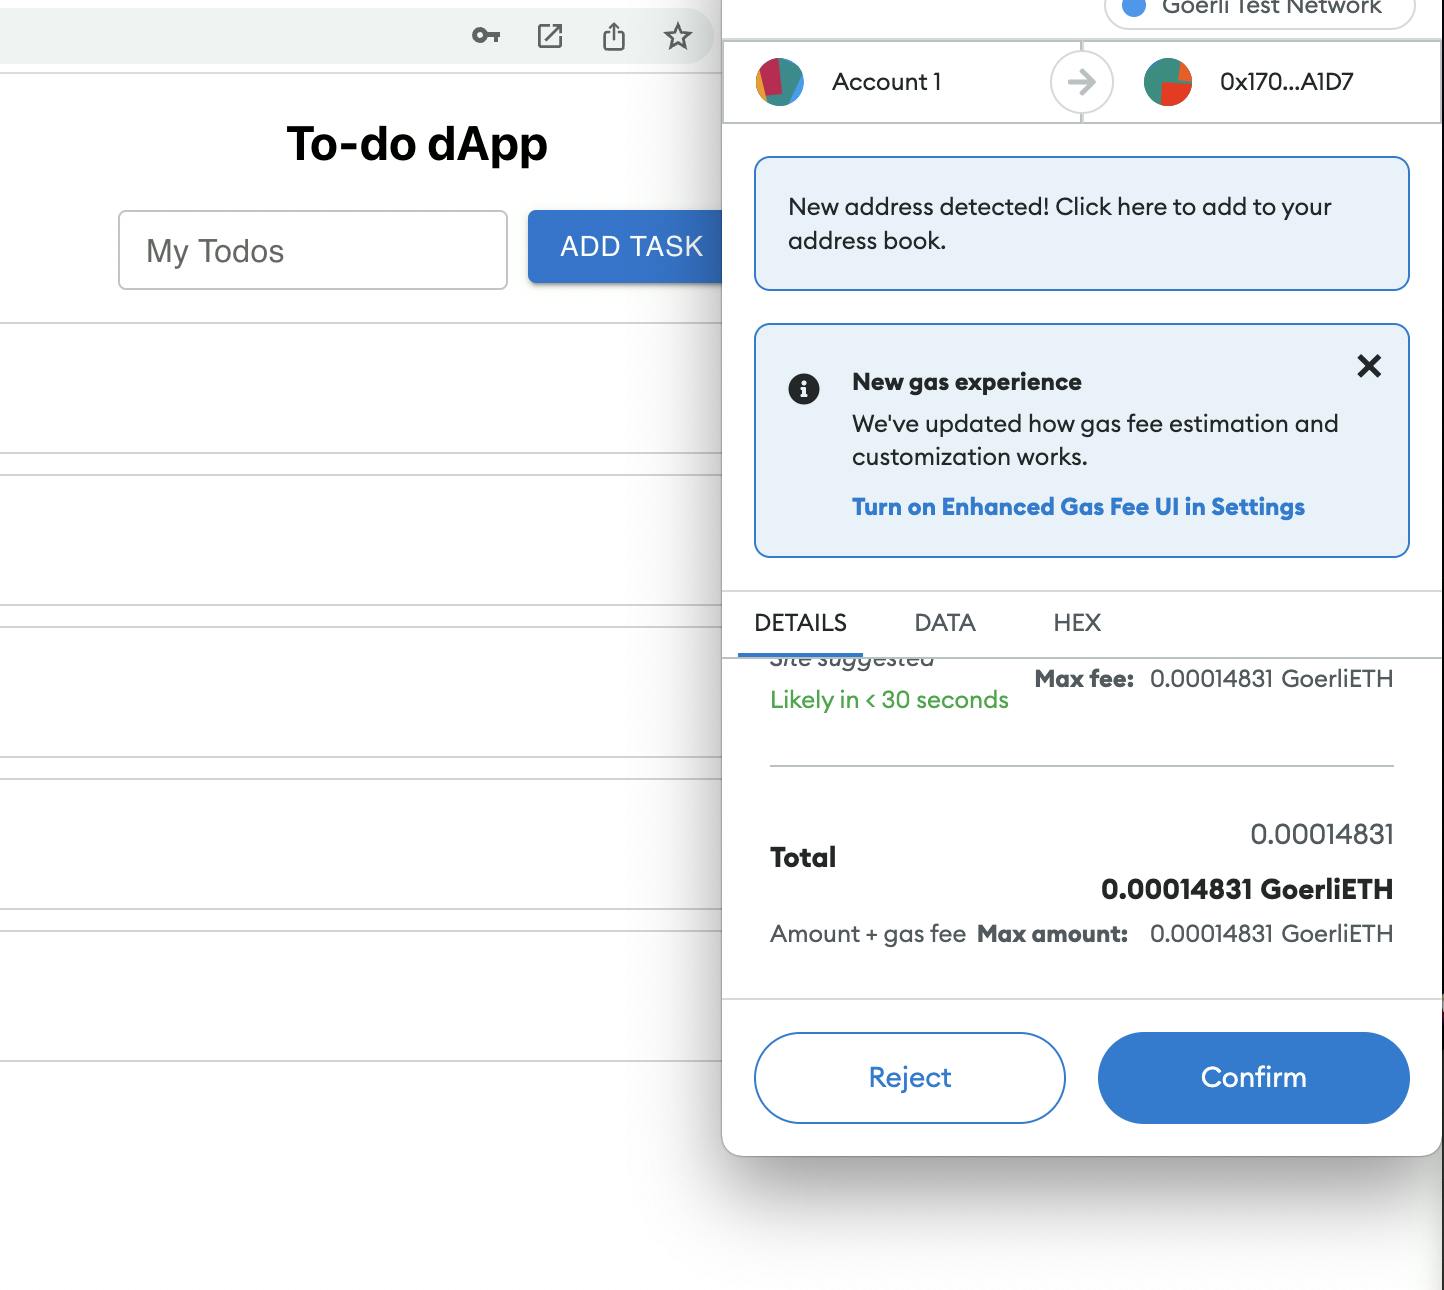
Once you're connected, try adding a task. This will open a pop-up from MetaMask. Confirm the transaction and wait for the transaction to be completed. This can take a while. After the transaction is confirmed, you can see your to-do item on the list.

If you have any problems with the code, you can clone or download the GitHub repository of this project. I hope you find this tutorial helpful, let me know in the comments if there is anything that is unclear.